This article explains how Canvas administrators can integrate Torus as an LTI 1.3 tool so instructors can add Torus links with Inspark content to their courses.
Overview of Steps
-
Create an LTI 1.3 Developer Key for Torus
-
Add Torus as an External App (LTI Tool) in Canvas
-
Register your Canvas instance with Torus (required once per institution)
-
Instructors can then add Torus links to their courses
Note: If you set up Torus in a Canvas sandbox, you must repeat the process in production. Developer Keys cannot be transferred between Canvas instances.
1. Create a Developer Key (LTI 1.3)
Note: You must be a Canvas administrator to complete this step.
-
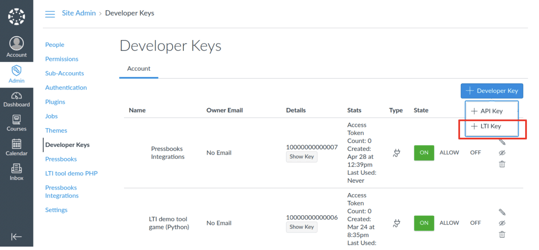
Go to Admin → [Root Account] → Developer Keys
-
Click + Developer Key → + LTI Key
-
Fill in the following fields in the table below.
-
Click Save.
-
Turn the new key ON.
-
Copy the Client ID from the Details column — you will need this in the next step.
| Setting | Value |
| Key Name | OLI Torus (recommended) |
| Method | Enter URL |
| JSON URL | https://proton.oli.cmu.edu/lti/developer_key.json |
| Redirect URIs | https://proton.oli.cmu.edu/lti/launch |
2. Add Torus as a Canvas External Tool (App)
This step makes Torus available to all courses in your Canvas instance.
- Navigate to Admin → [Root Account] → Settings → Apps → + App
- Select:
- Configuration Type: By Client ID
- Paste the Client ID from Step 1
- Click Submit → Install → Yes, Install.
- After installation, open the tool’s gear menu and copy the Deployment ID. You will use this during registration.
3. Register Canvas With Torus (Required Once Per Institution)
Your LMS must be registered in Torus before instructors can use it. This step sends your Deployment ID and key values securely to OLI.
-
Go to any Canvas course (test or real).
-
Click Modules → + Module (or use any existing module).
-
In the module, click + → select External Tool → choose OLI Torus.
-
Check Load in a new tab → Add Item.
-
Click the new Torus link → select Load OLI Torus in a new window.
-
The Registration Form will appear.
Fill out the registration form:
-
Institution Name (full official name)
-
Institution URL
-
Admin Email (shared team email recommended)
-
LMS Type: Canvas
-
Deployment ID (you copied earlier)
-
Leave Line items service domain blank
Click Register.
Inspark will review your registration. Approval may take up to 24 hours. If you need expedited approval, contact Inspark Support: support@inspark.education.
4. Add Torus to Canvas Courses (Admin or Instructor)
Once registration is approved:
-
Open a Canvas course
-
Go to Modules → + → External Tool
-
Select OLI Torus
-
Name the item → check Load in a new tab → Add Item
-
Publish it for students
When launched, instructors will see the Getting Started screen where they select Torus content.
FAQs
What if I cannot reach the registration form or get an error?
- Contact Inspark Support (support@inspark.education) to unlink the course and reset the connection.
Do I need to configure this twice (test vs. production)?
- Yes. If you integrate Torus in a test Canvas environment, you must repeat the steps in production, using the production Torus instance (proton.oli.cmu.edu).
Additional Resources
-
Canvas LTI Configuration Docs: https://community.instructure.com/en/kb/articles/661475-how-do-i-configure-an-lti-key-for-an-account
-
Inspark Support: support@inspark.education